Flask : créez votre première application web en Python
Article écrit par valentin et publiée le 20 juillet 2022
Que vous soyez débutant ou non, certaines situations vous amèneront à écrire vous-même des programmes Web. Le langage Python peut être une bonne alternative facile à apprendre et à utiliser. Flask est un micro-framework tout en Python qui ne requiert pas de connaissances techniques particulières – il suffit de l’installer et de le lancer.
Pourquoi Flask est utile ?
- Améliorez vos compétences en Python
- Créez votre première application Web
- Mettez vos compétences à jour
- Utilisez une plate-forme de développement facile à utiliser
- Découvrez des possibilités nouvelles pour votre CV
Alors, comment cela fonctionne ? Pour commencer, Flask est un framework de micro-contrôleur Web en Python. Flask permet aux développeurs d’avoir un contrôle total sur le code HTML et du code Python lui-même. Flask offre une interface très simple que nous allons voir dans un projet simple.
Que prévoir ?
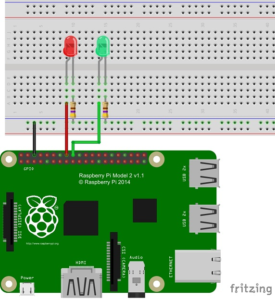
- Un raspberry Pi
- 2 LEDs de couleurs différentes
- plusieurs câbles
- Pour plus de confort, une platine d’essai
- 2 résistance de 470 Ohms
C’est parti pour l’installation de Flask !
Premièrement, il faut que votre raspberry soit mis en route avec Raspberry Pi OS.
Dans le cas contraire, je vous invite à vous rendre sur le site officiel :
https://raspberry-pi.fr/telechargements/
Commencez par faire la mise à jour de votre raspberry :
sudo apt-get update
sudo apt-get upgrade
Ensuite, vous devez installer l’environnement Python et le serveur web Flask :
sudo apt-get install python-pip python-flaskEnfin, avec pip, vous pouvez terminer l’installation micro-framework Python et ses dépendances :
sudo pip install flaskTout est prêt pour démarrer.
Mise en place :
De retour sur votre Raspberry, créez le dossier puis le fichier :
mkdir web-server
cd web-server
nano app.py
Vous êtes à présent dans l’éditeur du fichier créé, copiez ce code :
import RPi.GPIO as GPIO
from flask import Flask, render_template, request
app = Flask(__name__)

GPIO.setmode(GPIO.BCM)

# Create a dictionary called pins to store the pin number, name, and pin state:
pins = {
   23 : {'name' : 'GPIO 23', 'state' : GPIO.LOW},
   24 : {'name' : 'GPIO 24', 'state' : GPIO.LOW}
   }

# Set each pin as an output and make it low:
for pin in pins:
   GPIO.setup(pin, GPIO.OUT)
   GPIO.output(pin, GPIO.LOW)

@app.route("/")
def main():
   # For each pin, read the pin state and store it in the pins dictionary:
   for pin in pins:
      pins[pin]['state'] = GPIO.input(pin)
   # Put the pin dictionary into the template data dictionary:
   templateData = {
      'pins' : pins
      }
   # Pass the template data into the template main.html and return it to the user
   return render_template('main.html', **templateData)

# The function below is executed when someone requests a URL with the pin number and action in it:
@app.route("/<changePin>/<action>")
def action(changePin, action):
   # Convert the pin from the URL into an integer:
   changePin = int(changePin)
   # Get the device name for the pin being changed:
   deviceName = pins[changePin]['name']
   # If the action part of the URL is "on," execute the code indented below:
   if action == "on":
      # Set the pin high:
      GPIO.output(changePin, GPIO.HIGH)
      # Save the status message to be passed into the template:
      message = "Turned " + deviceName + " on."
   if action == "off":
      GPIO.output(changePin, GPIO.LOW)
      message = "Turned " + deviceName + " off."

   # For each pin, read the pin state and store it in the pins dictionary:
   for pin in pins:
      pins[pin]['state'] = GPIO.input(pin)

   # Along with the pin dictionary, put the message into the template data dictionary:
   templateData = {
      'pins' : pins
   }

   return render_template('main.html', **templateData)

if __name__ == "__main__":
   app.run(host='0.0.0.0', port=80, debug=True)
Ce code permet de contrôler l’allumage des LEDs. Mais sans signal venant du serveur web, elles ne s’allumeront pas. Nous allons donc créer les fichiers HTML :
mkdir templates
cd templates
nano main.html
Maintenant que vous êtes sur le fichier html, copiez ce code :
<!DOCTYPE html>
<head>
   <title>RPi Web Server</title>
   <!-- Latest compiled and minified CSS -->
   <link rel="stylesheet" href="https://maxcdn.bootstrapcdn.com/bootstrap/3.3.6/css/bootstrap.min.css" integrity="sha384-1q8mTJOASx8j1Au+a5WDVnPi2lkFfwwEAa8hDDdjZlpLegxhjVME1fgjWPGmkzs7" crossorigin="anonymous">
   <!-- Optional theme -->
   <link rel="stylesheet" href="https://maxcdn.bootstrapcdn.com/bootstrap/3.3.6/css/bootstrap-theme.min.css" integrity="sha384-fLW2N01lMqjakBkx3l/M9EahuwpSfeNvV63J5ezn3uZzapT0u7EYsXMjQV+0En5r" crossorigin="anonymous">
   <!-- Latest compiled and minified JavaScript -->
   <script src="https://maxcdn.bootstrapcdn.com/bootstrap/3.3.6/js/bootstrap.min.js" integrity="sha384-0mSbJDEHialfmuBBQP6A4Qrprq5OVfW37PRR3j5ELqxss1yVqOtnepnHVP9aJ7xS" crossorigin="anonymous"></script>
</head>

<body>
   <h1>RPi Serveur LED</h1>
   {% for pin in pins %}
   <h2>{{ pins[pin].name }}
   {% if pins[pin].state == true %}
      est actuellement <strong>allumé</strong></h2><div class="row"><div class="col-md-2">
      <a href="/{{pin}}/off" class="btn btn-block btn-lg btn-default" role="button">Eteindre</a></div></div>
   {% else %}
      is currentlyest actuellement <strong>éteint</strong></h2><div class="row"><div class="col-md-2">
      <a href="/{{pin}}/on" class="btn btn-block btn-lg btn-primary" role="button">Allumer</a></div></div>
   {% endif %}
   {% endfor %}
</body>
</html>
Ce code récupère les LEDs déclarés et permet de les allumer si elles sont éteintes et réciproquement.
Allumons maintenant le serveur !
cd ..
sudo python app.py
Maintenant que votre serveur est allumé, vous pouvez vous rendre à l’adresse ci-dessous :
Vous pouvez y contrôler vos LEDs !
Ce que vous venez de faire représente un premier pas vers la domotique.
En partant de cette base, il est possible de contrôler presque tout les appareils électrique chez vous, les applications sont presques infinis…
Amusez-vous !